
Building a Mini-VPC on Linux: What I Did in HNG Stage 4, Why It Works, and How You Can Recreate It
I built an AWS-style VPC using only Linux primitives on a single host. I used network namespaces for subnets, Linux bridges as the VPC router, veth pairs as cables, iptables for NAT and firewall rules, and a small CLI (vpcctl) to automate creation, peering, policies, and teardown. This guide explains every piece in plain language and then gives exact commands so beginners can follow and experts can audit.

What you’ll learn
- The minimum Linux building blocks behind a cloud VPC
- How to create two VPCs, each with public and private subnets
- How to route inside a VPC, add internet egress for the public subnet, and keep the private subnet internal
- How to enforce VPC isolation, then enable controlled peering
- How to apply “security group”-style rules from a JSON policy
- How to do it manually first, then run it with a one-file CLI (
vpcctl) - How to teardown cleanly and capture logs for submission
Plain-English glossary
- VPC (Virtual Private Cloud): a private network you control. Think “your own LAN in the cloud.”
- Subnet: a smaller slice of IP space inside the VPC, often “public” or “private.”
- Network namespace: a Linux feature that gives a process its own network stack. I used one namespace per subnet.
- veth pair: two virtual interfaces joined back-to-back, like an ethernet cable. Traffic entering one end exits the other.
- Linux bridge: a virtual switch. I used it as the “VPC router” and gave it an IP in each subnet so it can route.
- Routing: rules that say “to reach network X, send packets via gateway Y.”
- NAT (masquerade): rewrites source IPs on egress so many internal hosts can share the host’s real internet address.
- iptables: the Linux firewall and NAT engine.
- Security group: a set of allow/deny rules for traffic. I simulated this with iptables rules derived from a JSON policy.
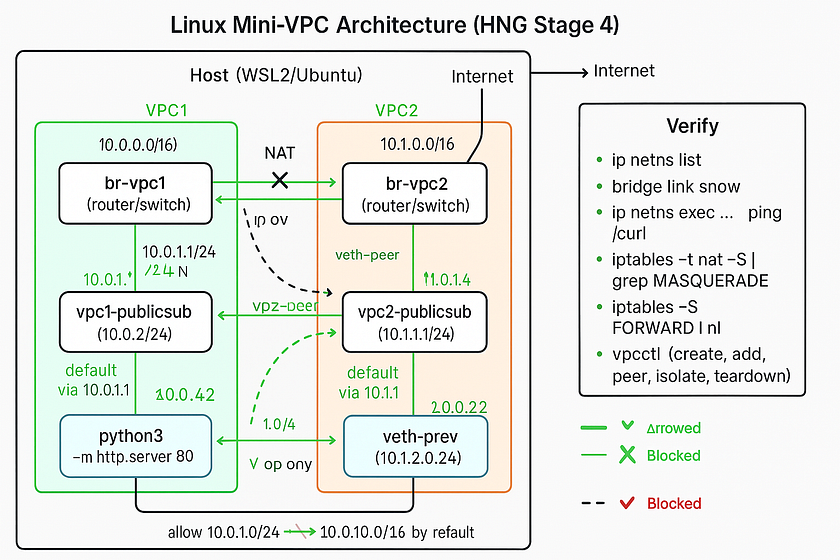
Architecture at a glance
Host (WSL/Ubuntu)
│
├─ br-vpc1 (bridge)  ─── 10.0.1.1/24  10.0.2.1/24
│    ├─ veth ↔ (ns) vpc1-publicsub   (10.0.1.2/24)
│    └─ veth ↔ (ns) vpc1-privatesub  (10.0.2.2/24)
│
├─ br-vpc2 (bridge)  ─── 10.1.1.1/24  10.1.2.1/24
│    ├─ veth ↔ (ns) vpc2-publicsub   (10.1.1.2/24)
│    └─ veth ↔ (ns) vpc2-privatesub  (10.1.2.2/24)
│
└─ eth0 → Internet
- Inside a VPC: subnets talk via the bridge/router.
- Public egress: only the public subnet gets NAT to the internet.
- Default isolation: VPC1 cannot reach VPC2 unless I create a peering link and allow specific CIDRs.
Prerequisites
- Linux or WSL2 (I used Ubuntu on WSL2)
sudoaccess- Installed:
iproute2(givesip,bridge),iptables,curl,python3 - Know your outbound interface name (often
eth0) - Enable routing
echo 1 | sudo tee /proc/sys/net/ipv4/ip_forward
Part A — Manual setup first (so the concepts stick)
We’ll build VPC1 with two subnets and get internal routing working.
1) Create the VPC “router” as a Linux bridge
sudo -i   # root shell helps avoid permission issues
ip link add name br-vpc1 type bridge
ip addr add 10.0.1.1/24 dev br-vpc1   # gateway IP for public subnet
ip addr add 10.0.2.1/24 dev br-vpc1   # gateway IP for private subnet
ip link set br-vpc1 up
2) Create subnet namespaces and connect with veth
ip netns add vpc1-publicsub
ip netns add vpc1-privatesub
# public
ip link add veth-public type veth peer name vb-public
ip link set vb-public master br-vpc1
ip link set vb-public up
ip link set veth-public netns vpc1-publicsub
ip -n vpc1-publicsub addr add 10.0.1.2/24 dev veth-public
ip -n vpc1-publicsub link set veth-public up
ip -n vpc1-publicsub route add default via 10.0.1.1
# private
ip link add veth-private type veth peer name vb-private
ip link set vb-private master br-vpc1
ip link set vb-private up
ip link set veth-private netns vpc1-privatesub
ip -n vpc1-privatesub addr add 10.0.2.2/24 dev veth-private
ip -n vpc1-privatesub link set veth-private up
ip -n vpc1-privatesub route add default via 10.0.2.1
Verify:
bridge link show
ip addr show br-vpc1
ip netns exec vpc1-publicsub  ip addr
ip netns exec vpc1-privatesub ip addr
3) Test routing inside the VPC
# both should work
ip netns exec vpc1-publicsub  ping -c2 10.0.2.2
ip netns exec vpc1-privatesub ping -c2 10.0.1.2
If you see Nexthop has invalid gateway, it means the gateway (e.g., 10.0.1.1) isn’t on-link. Fix by assigning that exact /24 to the bridge.
4) Add internet egress for public subnet only
# pick your outbound interface
WAN=eth0
# NAT the public subnet
iptables -t nat -A POSTROUTING -s 10.0.1.0/24 -o "$WAN" -j MASQUERADE
# allow forward traffic in/out via br-vpc1
iptables -P FORWARD DROP
iptables -A FORWARD -i br-vpc1 -o br-vpc1 -j ACCEPT
iptables -A FORWARD -i br-vpc1 -o "$WAN" -m state --state NEW,RELATED,ESTABLISHED -j ACCEPT
iptables -A FORWARD -i "$WAN" -o br-vpc1 -m state --state RELATED,ESTABLISHED -j ACCEPT
Test:
ip netns exec vpc1-publicsub  ping -c2 1.1.1.1      # should work
ip netns exec vpc1-privatesub ping -c2 1.1.1.1 || echo "blocked as expected"
5) Run a tiny HTTP app in the public subnet
ip netns exec vpc1-publicsub python3 -m http.server 80 &
sleep 1
ip netns exec vpc1-privatesub curl -I http://10.0.1.2:80   # HTTP/1.0 200 OK
Now you’ve got:
- VPC1 with public + private subnets
- Internal routing
- NAT egress only for the public subnet
- A test workload reachable inside the VPC
Part B — VPC isolation, then optional peering
Create VPC2 similarly with 10.1.0.0/16 and subnets 10.1.1.0/24, 10.1.2.0/24. By default, keep VPCs isolated:
# drop cross-VPC by default
iptables -A FORWARD -s 10.0.0.0/16 -d 10.1.0.0/16 -j DROP
iptables -A FORWARD -s 10.1.0.0/16 -d 10.0.0.0/16 -j DROP
Test isolation:
ip netns exec vpc1-publicsub ping -c2 10.1.1.2 || echo "isolated as expected"
ip netns exec vpc2-publicsub ping -c2 10.0.1.2 || echo "isolated as expected"
Peering (controlled allow)
Create a veth pair between br-vpc1 and br-vpc2 and then allow only specific CIDRs (e.g., public↔public):
# peer the bridges
ip link add vpc1-peer type veth peer name vpc2-peer
ip link set vpc1-peer master br-vpc1
ip link set vpc2-peer master br-vpc2
ip link set vpc1-peer up
ip link set vpc2-peer up
# allow just public <-> public
iptables -A FORWARD -s 10.0.1.0/24 -d 10.1.1.0/24 -j ACCEPT
iptables -A FORWARD -s 10.1.1.0/24 -d 10.0.1.0/24 -j ACCEPT
Test:
ip netns exec vpc1-publicsub ping -c2 10.1.1.2   # now OK
ip netns exec vpc2-publicsub ping -c2 10.0.1.2   # now OK
Private subnets remain blocked.
Part C — “Security groups” from JSON
You can simulate per-subnet rules by applying iptables rules that match the subnet. Example policy:
{
  "subnet": "10.0.1.0/24",
  "ingress": [
    {"port": 80,  "protocol": "tcp", "action": "allow"},
    {"port": 22,  "protocol": "tcp", "action": "deny"},
    {"port": 443, "protocol": "tcp", "action": "deny"}
  ]
}
A simple policy applier can translate this into iptables INPUT rules inside the namespace, or FORWARD rules on the host matching -d 10.0.1.0/24 -p tcp --dport ….
# HTTP allowed
ip netns exec vpc1-privatesub curl -sI http://10.0.1.2:80 | head -n1
# SSH blocked (prove with TCP connect)
ip netns exec vpc1-privatesub bash -lc 'timeout 2 bash -c "</dev/tcp/10.0.1.2/22" && echo OPEN || echo BLOCKED"'
# Expect: BLOCKED
Automating with vpcctl (one-file CLI)
After doing it by hand, I wrapped the flow in a portable CLI so I can create, inspect, peer, and teardown quickly.
Examples:
# add CLI to PATH for this session
chmod +x ./bin/vpcctl
export PATH="$PWD/bin:$PATH"
# record all actions with timestamps
script -f demo_stage4.log
# clean start
vpcctl teardown-vpc --name vpc1 || true
vpcctl teardown-vpc --name vpc2 || true
# VPC1
vpcctl create-vpc --name vpc1 --cidr 10.0.0.0/16
vpcctl add-subnet --vpc vpc1 --name publicsub  --cidr 10.0.1.0/24
vpcctl add-subnet --vpc vpc1 --name privatesub --cidr 10.0.2.0/24
vpcctl allow-intra-vpc vpc1
vpcctl enable-nat --vpc vpc1 --subnet publicsub --wan eth0
vpcctl deploy-http --vpc vpc1 --subnet publicsub --port 80
# VPC2
vpcctl create-vpc --name vpc2 --cidr 10.1.0.0/16
vpcctl add-subnet --vpc vpc2 --name publicsub  --cidr 10.1.1.0/24
vpcctl add-subnet --vpc vpc2 --name privatesub --cidr 10.1.2.0/24
vpcctl allow-intra-vpc vpc2
# isolate then peer selectively
vpcctl isolate-vpcs --cidr-a 10.0.0.0/16 --cidr-b 10.1.0.0/16
vpcctl peer-vpcs --bridge-a br-vpc1 --bridge-b br-vpc2
vpcctl allow-cidr --src 10.0.1.0/24 --dst 10.1.1.0/24
vpcctl allow-cidr --src 10.1.1.0/24 --dst 10.0.1.0/24
# inspection snapshots
vpcctl inspect
# teardown
vpcctl teardown-vpc --name vpc2
vpcctl teardown-vpc --name vpc1
exit  # ends the 'script' logging
This produces demo_stage4.log which satisfies “logs show all activities.”
Troubles I hit and how I fixed them
- “Operation not permitted” creating bridges/namespaces → run as root (
sudo -i), or addsudoper command. - “Nexthop has invalid gateway” when adding default routes inside subnets → the bridge must have an on-link gateway IP in that /24 (e.g., 10.0.1.1 for 10.0.1.0/24).
- No inter-subnet traffic even with routes → enable Linux routing:
echo 1 > /proc/sys/net/ipv4/ip_forward. - Internet from public subnet not working → wrong outbound interface in MASQUERADE. Use the real one (WSL often
eth0). Verify withiptables -t nat -S - veth name too long → Linux limits interface names to 15 chars. Use short names (
v2pub,v2pbr, etc.). - Cross-VPC pings failing after peering → default
FORWARDpolicy is DROP. Add explicitACCEPTrules for the allowed CIDRs in both directions. Keep the generalDROPfor everything else. - “Redirect Host (New nexthop …)” ICMP messages → not an error. It’s the bridge telling the host a more direct path exists.
- Docker chains in iptables: they coexist. I confined my rules to the VPC bridges (e.g.,
-i br-vpc1) and specific CIDRs.
Verification checklist (for your video/demo)
Show each with a visible system clock and readable terminal:
- Create VPC1 + subnets
- vpcctl create-vpc …, vpcctl add-subnet …
vpcctl inspect shows br-vpc1, namespaces, and routes
2. Intra-VPC routing
ping between 10.0.1.2 and 10.0.2.2
3. Public NAT works
vpcctl enable-nat …ip netns exec vpc1-publicsub ping 1.1.1.1worksip netns exec vpc1-privatesub ping 1.1.1.1blocked
4. Deploy app
vpcctl deploy-http --vpc vpc1 --subnet publicsub --port 80curl -I http://10.0.1.2returns 200
5. Create VPC2 and isolate
vpcctl create-vpc vpc2 …vpcctl isolate-vpcs …- cross-VPC
pingfails
6. Peer and allow only public↔public
vpcctl peer-vpcs …vpcctl allow-cidr …twice- public↔public
pingsucceeds - private↔public remains blocked
7. Apply JSON policy (optional)
- HTTP allowed, SSH blocked test
8. Final inspect + teardown
vpcctl inspectvpcctl teardown-vpc vpc2 && vpcctl teardown-vpc vpc1- Show
ip netns listandip addr show type bridgeempty
Tips for Windows/WSL users
- Do everything inside WSL2 Ubuntu.
- Outbound interface is usually
eth0. - iptables and routing work in WSL2’s Linux kernel; Docker chains may exist, which is normal.
- Use short interface names to avoid “not a valid ifname.”
Repo layout I used
hng-stage4-vpc/
├─ bin/
│  └─ vpcctl                # CLI (Bash or Python)
├─ policies/
│  └─ vpc1-public-http-only.json
├─ README.md                # quickstart + commands
├─ runbook.md               # operator actions, common fixes
└─ demo_stage4.log          # full terminal transcript with timestamps
Closing thoughts
A cloud VPC is just strong composition of simple parts: namespacing, switching, routing, NAT, and filtering. Doing it by hand makes the mental model obvious, and wrapping it into a tiny CLI removes the toil. If you can build this on a laptop, you’ll debug the real thing much faster in production.
If you follow the exact steps above, you’ll meet the Stage 4 acceptance criteria: